
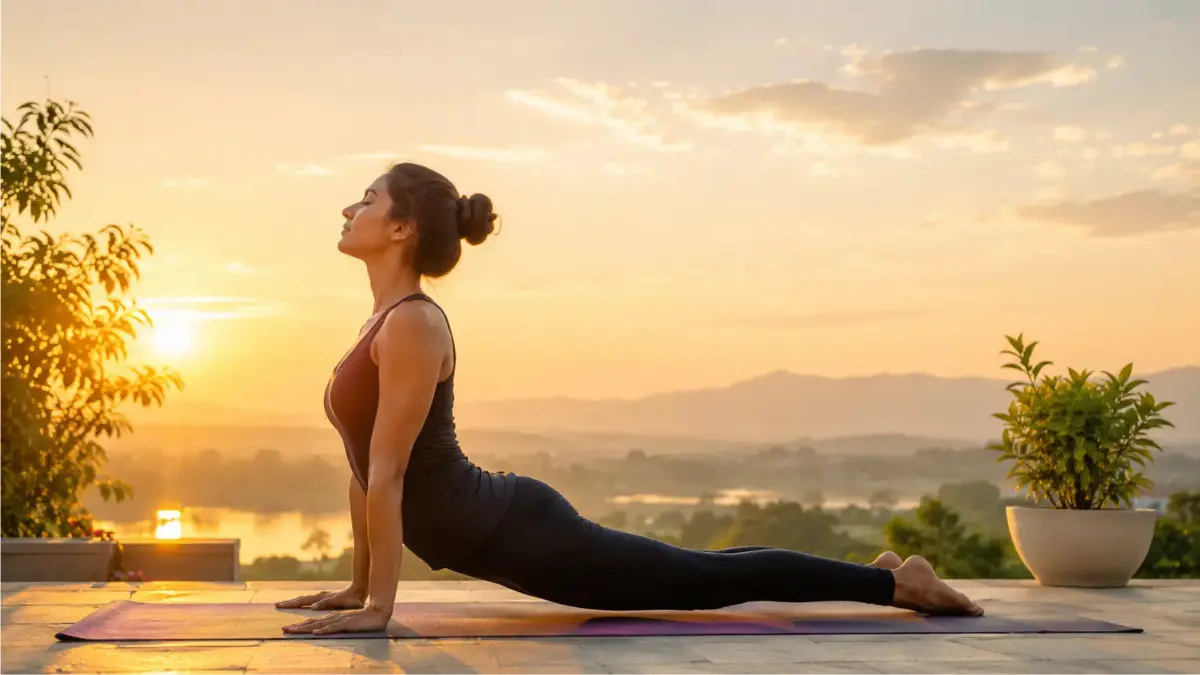
Surya Namaskar (Sun Salutation) is one of the most popular yoga practices in the world, and for good reason. It combines 12 yoga poses into one smooth sequence that helps stretch, strengthen, and energize the entire body. Whether you’re completely new to yoga or looking for a simple daily routine, Surya Namaskar is an easy place to start.
Unlike practicing individual poses, this sequence keeps your body moving while coordinating each movement with your breath. That combination can help improve flexibility, balance, posture, and body awareness over time. Many people also enjoy practicing it in the morning because it helps them feel more awake and focused before the day begins.
In this guide, you’ll learn what Surya Namaskar is, how to perform all 12 steps correctly, its health benefits, the best time to practice, common mistakes to avoid, and simple tips for beginners.
In This Article
What Is Surya Namaskar?
Surya Namaskar, also known as Sun Salutation, is a sequence of 12 yoga poses performed in a continuous flow while coordinating each movement with your breath. In Sanskrit, Surya means “Sun,” and Namaskar means “to salute” or “to offer respect.” Traditionally practiced at sunrise, it is a way to begin the day with mindful movement and focused breathing.
Unlike individual yoga poses, Surya Namaskar works as a full-body sequence. It combines forward bends, backbends, lunges, and strength-building poses to improve flexibility, balance, coordination, and overall fitness. The synchronized breathing pattern also encourages body awareness and helps you move with better control.
Whether you’re a beginner or an experienced yoga practitioner, Surya Namaskar can be adapted to your fitness level by adjusting the pace and number of rounds.
How to Do the 12 Steps of Surya Namaskar (With Breathing Cues)
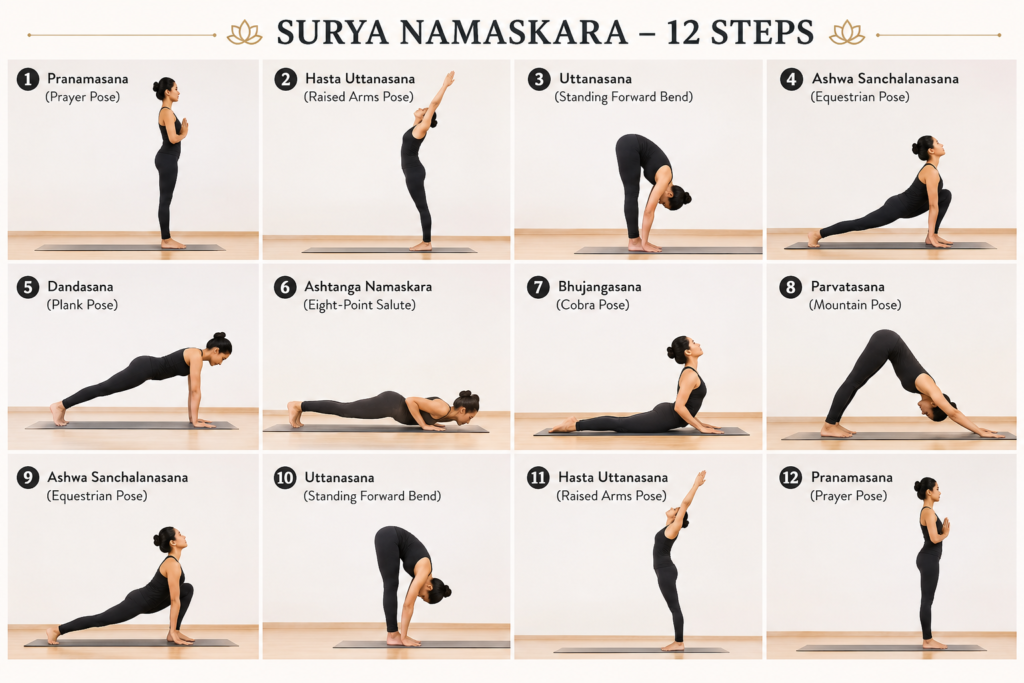
Step 1: Pranamasana (Prayer Pose)
Stand upright with your feet together and your spine straight. Bring your palms together in front of your chest and relax your shoulders. Take a few normal breaths while focusing on your posture and preparing your mind for the sequence.
Benefits: Encourages mindfulness, improves posture, and helps you begin the practice with focus.
Step 2: Hastauttanasana (Raised Arms Pose)
Inhale as you raise both arms overhead and gently arch your upper body backward from the upper back. Keep your core engaged and avoid collapsing your lower back.
Benefits: Stretches the chest and abdomen, opens the shoulders, and encourages deeper breathing.
Step 3: Padahastasana (Standing Forward Bend)
Exhale and bend forward from your hips, bringing your hands toward the floor beside your feet. Keep your knees slightly bent if your hamstrings feel tight.
Benefits: Stretches the hamstrings and calves, improves flexibility, and promotes spinal mobility.
Step 4: Ashwa Sanchalanasana (Equestrian Pose)
Inhale and step one leg back while lowering the knee to the floor. Keep your front knee above the ankle, lift your chest, and look forward comfortably.
Benefits: Opens the hip flexors, improves balance, and stretches the legs and chest.
Step 5: Dandasana (Plank Pose)
Exhale and step the other foot back to form a straight line from your head to your heels. Engage your core and avoid letting your hips sag.
Benefits: Strengthens the core, arms, shoulders, and helps improve overall stability.
Step 6: Ashtanga Namaskara (Eight-Point Salute)
Exhale as you lower your knees, chest, and chin to the floor while keeping your hips slightly raised. Your eight points of contact should touch the mat gently.
Benefits: Builds upper-body strength, improves body control, and prepares the body for the next backbend.
Step 7: Bhujangasana (Cobra Pose)
Inhale and slide your chest forward, lifting it gently while keeping your elbows close to your body. Relax your shoulders and avoid overextending your lower back.
Benefits: Strengthens the back, opens the chest, and improves spinal flexibility.
Step 8: Adho Mukha Svanasana (Downward-Facing Dog)
Exhale and lift your hips upward to create an inverted V shape. Press your palms firmly into the mat, lengthen your spine, and keep a slight bend in your knees if needed.
Benefits: Stretches the hamstrings and calves, strengthens the shoulders and arms, and helps lengthen the spine.
Step 9: Ashwa Sanchalanasana (Equestrian Pose)
Inhale and bring one foot forward between your hands while lowering the opposite knee to the floor. Lift your chest, look forward, and keep your front knee aligned over your ankle.
Benefits: Stretches the hip flexors, improves balance, and prepares the body for the standing position.
Step 10: Padahastasana (Standing Forward Bend)
Exhale and bring the back foot forward, returning to a standing forward bend. Relax your neck and let your upper body fold naturally. Bend your knees slightly if reaching the floor feels uncomfortable.
Benefits: Stretches the back of the legs, improves flexibility, and helps release tension in the lower back.
Step 11: Hastauttanasana (Raised Arms Pose)
Inhale as you slowly rise, lifting your arms overhead and gently extending your upper body backward. Keep your core engaged and avoid leaning too far.
Benefits: Opens the chest and shoulders, stretches the front of the body, and encourages deep breathing.
Step 12: Pranamasana (Prayer Pose)
Exhale and return to an upright standing position with your palms together in front of your chest. Relax your shoulders and take a slow, steady breath before beginning the next round.
Benefits: Restores balance, promotes mindfulness, and completes one half of the Surya Namaskar sequence.
Beginner Tip: Complete the sequence once with your right leg moving back in Step 4, then repeat it with your left leg moving back. This counts as one complete round of Surya Namaskar.
Top Benefits of Surya Namaskar
Practicing Surya Namaskar regularly offers more than just a good stretch. Because it combines movement, breathing, and balance, it can support both physical fitness and overall well-being when performed consistently.
Supports Full-Body Fitness
Surya Namaskar engages multiple muscle groups, including the legs, core, chest, shoulders, back, and arms. Moving through the sequence regularly can help improve overall strength, coordination, and body awareness. Research published in the Journal of Physical Therapy Science found that a 12-week yoga program including sun salutation practices improved flexibility and balance.
Improves Flexibility and Mobility
The combination of forward bends, backbends, and lunges helps stretch tight muscles and increase joint mobility. Over time, this may make everyday movements feel more comfortable and improve your range of motion.
Encourages Better Balance and Posture
Several poses require you to stabilize your body while maintaining proper alignment. Regular practice can improve balance, posture, and movement control, which may also help reduce strain caused by long hours of sitting.
Promotes Mindful Breathing
Each movement is synchronized with your breath, encouraging slower and more controlled breathing. This mindful approach can help you stay focused during practice and support relaxation. A systematic review in the International Journal of Yoga reported that yoga practices may help reduce perceived stress and improve mood.
Easy to Build Into a Daily Routine
One of the biggest advantages of Surya Namaskar is its simplicity. You don’t need special equipment or a large workout space, making it an easy habit to include in your morning or evening routine.
Best Time to Practice Surya Namaskar
Many people prefer practicing Surya Namaskar in the morning because it helps wake up the body, improve focus, and establish a healthy daily routine. Practicing on an empty stomach or at least 2–3 hours after a meal is generally more comfortable.
If mornings don’t fit your schedule, you can also practice in the evening. While it may not follow the traditional timing, it can still help you stay active, improve flexibility, and unwind after a long day. The most important factor is consistency. Choosing a time that you can stick to regularly is often more beneficial than practicing only occasionally at the “perfect” time.
Simple Beginner Plan for Surya Namaskar
If you are new to Surya Namaskar, start slowly and focus on learning the correct movements rather than completing many rounds. A simple progression can help your body adapt comfortably.
Week 1: Practice 2 rounds daily and focus on breathing and alignment.
Week 2: Increase to 4 rounds if your body feels comfortable.
Week 3 and beyond: Gradually add more rounds based on your fitness level and energy.
Remember, consistency matters more than speed. A few mindful rounds performed regularly can be more beneficial than rushing through a longer practice with poor form.
Common Mistakes to Avoid During Surya Namaskar
Surya Namaskar is simple to learn, but practicing with the wrong technique can reduce its benefits and may increase the risk of discomfort. Keep these common mistakes in mind:
- Holding your breath: Try to match each movement with slow, controlled breathing instead of rushing through the sequence.
- Moving too quickly: Focus on smooth transitions and proper alignment rather than completing more rounds.
- Forcing flexibility: Never push your body into deep stretches. Modify poses by bending your knees or reducing the range of movement when needed.
- Ignoring posture: Keep your spine, knees, and shoulders properly aligned during each pose.
If you have an injury, severe back pain, heart condition, uncontrolled high blood pressure, or other health concerns, consult a healthcare professional before starting a new yoga routine.
Frequently Asked Questions
How many Surya Namaskars should a beginner do?
Beginners can start with 2–4 rounds daily and gradually increase as their body adapts. Focus on proper form and breathing rather than speed.
Is Surya Namaskar enough exercise?
Surya Namaskar provides stretching, mobility, and strength benefits. For complete fitness, combine it with activities like walking, strength training, or cardio.
Can Surya Namaskar help with weight loss?
Surya Namaskar supports an active lifestyle and can increase daily movement. However, healthy weight loss also depends on nutrition, sleep, and overall habits.
What is the best time for Surya Namaskar?
Morning is a popular choice because it helps build a consistent routine. However, the best time is when you can practice regularly.
Final Thoughts
Surya Namaskar is more than just a series of yoga poses—it is a simple practice that combines movement, breathing, and mindfulness. Whether you want to improve flexibility, build strength, or create a healthier daily routine, starting with a few mindful rounds can be a great first step.
The key is consistency. Practice at your own pace, focus on proper alignment, and gradually increase your rounds as your body becomes stronger and more comfortable.
